The Example.htm file is implemented as follows:
<!DOCTYPE html PUBLIC "-//W3C//DTD XHTML 1.0 Transitional//EN"
    "http://www.w3.org/TR/xhtml1/DTD/xhtml1-transitional.dtd">
<html xmlns="http://www.w3.org/1999/xhtml">

<head>
<meta http-equiv="Content-Type" content="text/html; charset=utf-8" />
<title>jQuery Validation Example</title>
    <link href="Styles/ui-lightness/jquery-ui-1.8.13.custom.css"
        rel="stylesheet" type="text/css" />
    <link href="Styles/Site.css" rel="stylesheet" type="text/css" />

    <script src="Scripts/jquery-1.6.1.min.js" type="text/javascript"></script>
    <script src="Scripts/jquery-ui-1.8.13.custom.min.js" type="text/javascript"></script>
    <script src="Scripts/jquery.validate.min.js" type="text/javascript"></script>
    <script src="Scripts/jquery.validate.wrapper.js" type="text/javascript"></script>

<script type="text/javascript" language="javascript">

    $(document).ready(function () {
        // 1. prepare the validation rules and messages.
        var rules = {
            textbox1: {
                required: true,
                minlength: 2
            },
            textbox2: "required",
            textbox3: "required"
        };
        var messages = {
            textbox1: {
                required: "textbox1 is required",
                minlength: "textbox1 needs to be at least length 2"
            },
            textbox2: "textbox2 is requried",
            textbox3: "textbox3 is required"
        };

        // 2. Initiate the validator
        var validator
            = new jQueryValidatorWrapper("FormToValidate",
                rules, messages);

        // 3. Set the click event to do the validation
        $("#btnValidate").click(function () {
            if (!validator.validate())
                return;

            alert("Validation Success!");
        });
    });

</script>
</head>

<body>

<form id="FormToValidate" action="#">
<table>
    <tr>
        <td>
            <input type="text" id="textbox1" name="textbox1" />
        </td>
        <td>
            <input type="text" id="textbox2" name="textbox2" />
        </td>
    </tr>
    <tr>
        <td>
            <input type="text" id="textbox3" name="textbox3" />
        </td>
        <td>
            <input type="button" id="btnValidate"
                style="width: 100%" value="Validate" />
        </td>
    </tr>
</table>
</form>

</body>
</html>
This HTML file has three text boxes and a button. The purpose of this example is to validate the content in the text boxes when the button is clicked. To set up the validation, we need to go through three steps in the $(document).ready event.
jQueryValidatorWrapper function. The validation rules and messages are also passed to this function. The jQueryValidatorWrapper function is implemented in the jquery.validate.wrapper.js file.This piece of code is pretty simple, but you should pay some attention to the following:
name" attribute. The validation rules and messages are associated with the name attribute.Now let us take a look at the jQueryValidatorWrapper function.
The jQueryValidatorWrapper function is implemented in the jquery.validate.wrapper.js file:
var dialogIdSeed = 1000000000;
function jQueryValidatorWrapper(formId, rules, messages) {
    // Get an Id for the "<div>" to diaply the error messages.
    // The Id is made sure to be unique in the web page.
    var dialogId = "V_dia_log" + dialogIdSeed++;
    while ($("#" + dialogId).length != 0) {
        alert(dialogId);
        dialogId = "V_dia_log" + dialogIdSeed++;
    }

    // create the error message "div" and add it to the dom.
    // it will be use to display the validation error messages.
    var dialogText = "<div id='" + dialogId
            + "' title='Please correct the errors ...'>"
            + "<ul /></div>";
    $("body").append(dialogText);
    var $dialog = $("#" + dialogId);
    var $ul = $("#" + dialogId + ">ul");

    $dialog.dialog({
        autoOpen: false,
        modal: true,
        close: function (event, ui) {
            $ul.html("");
        }
    });

    // hook up the form, the validation rules, and messages with jQuery validate.
    var showErrorMessage = false;
    var validator = $("#" + formId).validate({
        onchange: true,
        rules: rules,
        messages: messages,
        errorPlacement: function (error, element) {
            if (showErrorMessage) {
                var li = document.createElement("li")
                li.appendChild(document
                    .createTextNode(error.html()));
                $ul.append(li);
            }
        },
        showErrors: function (errorMap, errorList) {
            this.defaultShowErrors();
            if ((errorList.length != 0) && showErrorMessage) {
                $dialog.dialog('open');
            }
        }
    });

    // This is the function to call whem make the validation
    this.validate = function () {
        showErrorMessage = true;
        var result = validator.form();
        showErrorMessage = false;

        return result;
    };
}
The jQueryValidatorWrapper function does the following:
div element and appends it to the DOM. It makes sure that the ID of the div element is unique in the web page. This div element will be used as a dialog box to display the error messages if the validation fails.If the validation fails a textbox, we need to highlight it. The CSS class used to highlight the HTML element is implemented in the Site.css file.
.error
{
 border-color:red;
 border-style:solid;
 border-width:1px;
}
The jQuery Validation Plug-in will look for the .error class to apply styles to failed HTML elements. You can implement this CSS class to highlight the failed elements whatever way you want. In this example, if a text box fails validation, I will simply give it a red border.
Now that we have finished reviewing the code, we can test run the web page. Set the Example.htm file as the start up page; we can debug and run the application in Visual Studio.

When the web page first loads, we can see the three text boxes and the Validate button.
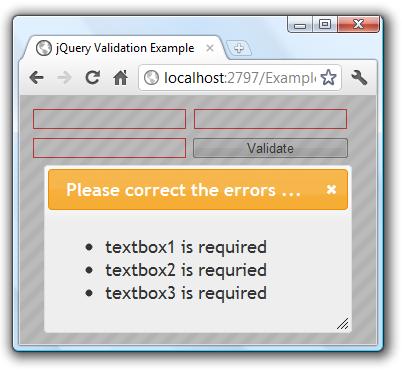
Without typing anything in the text boxes and clicking the Validate button, the validation will fail all the three text boxes. The text boxes are highlighted with red borders and a dialog box shows up asking us to correct the problems.
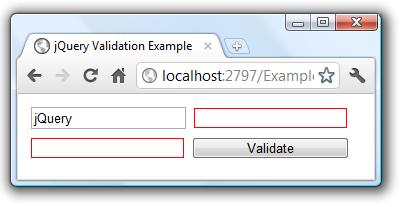
After closing the dialog box, we can type something into the text boxes. You may notice that when the text in a text box becomes valid, the red border disappears.
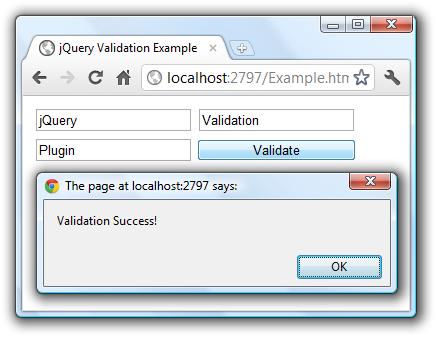
If we give all the three text boxes valid texts, clicking the Validate button shows up the message box telling us that the validation was successful.
div element into the DOM in the jquery.validate.wrapper.js file when I initiate the validator. This div element will be given an ID in the form of "V_dia_log1???..". If you accidentally have an HTML element having an ID of the same pattern in your web page, the jQueryValidatorWrapper function will eventually find a unique ID for the div element, but it may take some time. If you want to use jquery.validate.wrapper.js as it is in your applications, you should avoid assigning any element in the page an ID of the same pattern.